
Blog
Step-by-Step Guide to Using a Virtual Room Design Tool (for Beginners)
Why Use a Virtual Room Planner? (Even for Beginners)
Reduce Guesswork & Regret
Using a virtual design tool helps you preview furniture placement, wall colors, and lighting ahead of time — before buying anything. That reduces costly mistakes like buying a sofa that doesn’t fit or clashes with the space.
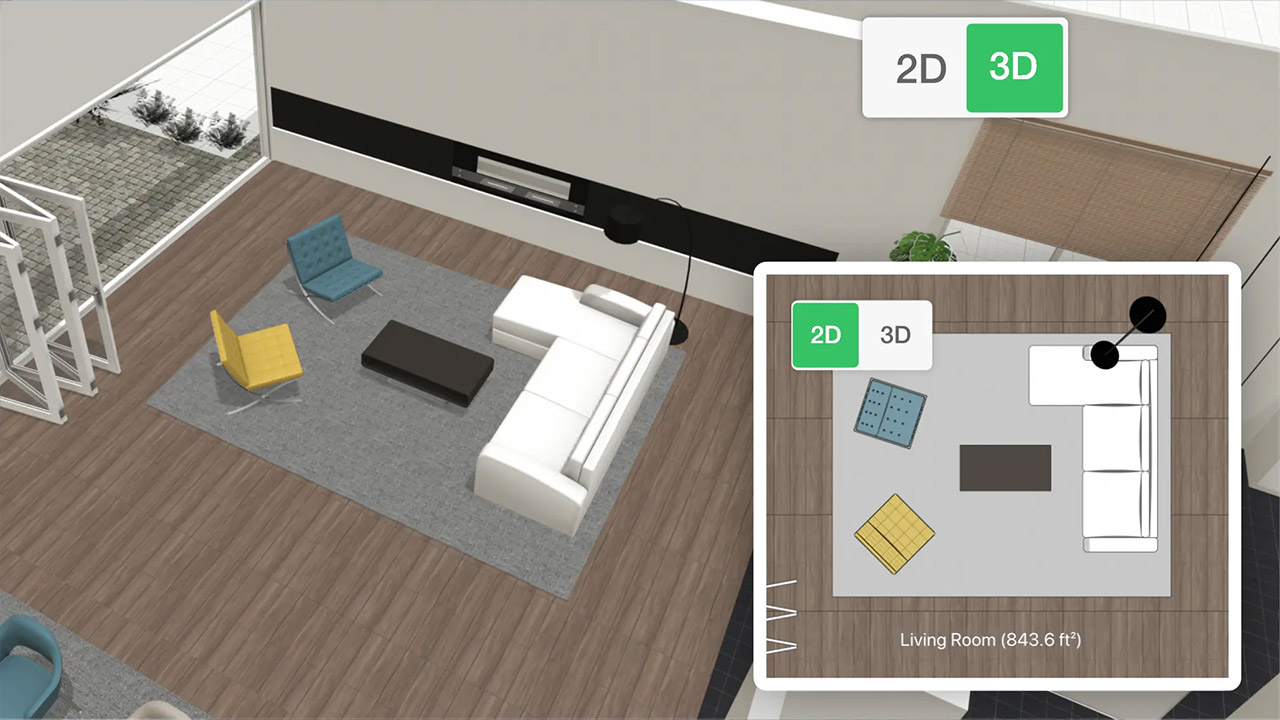
Visualize in 3D & Walk Through Your Space
Many tools offer 3D room planners and even walkthroughs, giving a realistic sense of depth, scale, and spatial relationships. Home.by.me, for example, highlights how 3D layout planning transforms interiors by letting users “navigate” through the design.
Accessible & Cost-Effective
Virtual planners often have free or freemium tiers for beginners. The Spruce lists multiple free online room layout planners that let users drag-and-drop furniture and adjust dimensions without heavy investment.
Choosing the Right Virtual Room Design Tool
Before diving in, you should evaluate a few criteria:
- Ease of use: Beginners benefit from intuitive drag-and-drop interfaces.
- 2D & 3D support: Some tools let you start in 2D, then shift to 3D for a realistic view.
- Catalog & furniture libraries: Having real furniture models helps in imagining the real outcome.
- Export / sharing functionality: PDF, image export, or sharing links is useful for reviewing or collaborating.
- Platform compatibility: Web-based vs desktop vs mobile app.
- Cost / licensing: Free, subscription, or one-time fee plans.
Examples of tools:
- Planner 5D: Offers both 2D and 3D design modes. Reviews mention it as accessible and versatile for users.
- Floorplanner: Called one of the best overall by TechRadar, with easy steps to design in-browser.
- HomeByMe: Known for high-quality visual outputs, though free tiers have limitations.
- Magicplan: Useful for capturing real room dimensions via AR and generating floor plans.
Each has tradeoffs. For a true beginner aiming for simplicity, start with Planner 5D or Floorplanner before advancing to more complex tools.
Step-by-Step Workflow: How to Use a Virtual Room Design Tool
Below is a practical sequence you can follow. You can adapt the steps depending on which tool you choose.
Step 1: Measure Your Room Accurately
Start with floor dimensions: length, width, ceiling height, locations of doors and windows. Some tools like Magicplan can help you capture these via AR using your phone.
Step 2: Create the Base Floor Plan
In the tool, input wall boundaries, partition walls, and architectural features (columns, alcoves). Use the 2D mode if available.
This defines the canvas your design will operate on.
Step 3: Add Furniture & Décor Elements
Drag and drop furniture models from the library. Try to match real-world pieces (size, style) to your budget.
Many tools allow you to customize dimensions or swap items.
Step 4: Switch to 3D View / Render
Once arrangement is done, switch to 3D to see the space in perspective. Adjust lighting, materials, and textures.
Walk-through modes in tools like HomeByMe let you virtually “tour” the room.
Step 5: Refine Layouts & Try Alternatives
Experiment with multiple layouts. Try rotating furniture, changing styles, or removing items. This “what-if” mode is one of the most powerful benefits.
Step 6: Export, Save, & Share
Export your layout as an image, PDF or share a link. This helps you review, get feedback, or bring it to suppliers/designers.
Step 7: Compare with Real-World Reality
Make sure chosen items correspond to actual stock (size, availability). This is where platforms like DecoraSync have advantage — linking visualization with real products.
Tips & Best Practices for Beginners
- Start simple: design one room rather than the whole house initially.
- Use snap-to-grid and measurement tools to maintain alignment.
- Always test walk-through or rotate views to reveal blind spots.
- Use real product libraries (brands you’ll buy from) when possible for realistic expectations.
- Save multiple versions; you might like an alternate layout later.
- Be mindful of flooring, lighting, and vertical storage (walls matter).
- Get feedback from friends or designers using shareable links.
Advantages and Limitations
Advantages
- Saves time and money by catching design flaws early
- Helps non-experts visualize spaces before buying
- Encourages experimentation without risk
- Bridges gap between planning and actual purchase
Limitations
- Rendering quality may be lower in free or basic versions
- Furniture libraries may not include all real-world items
- Tools may not account for structural or electrical constraints
- The “human touch” in style coherence is still best handled by skilled designers
A review of 10 interior design AI tools by Spaces by Dee highlighted that not all tools excel at layout planning — some natively create beautiful visuals but don’t optimize furniture placement intelligently.
Example Use Case (Beginner Scenario)
Scenario: You’ve just moved into a two-bedroom condo in Toronto and want to decorate your living room.
Steps you’d take:
- Measure the room (12’ × 15’) with door and window placements.
- Start in 2D mode in Planner 5D or Floorplanner.
- Add sofa, TV console, coffee table, accents from their catalog.
- Switch to 3D view — adjust lighting, wall color, rugs.
- Try an alternative layout: sofa facing window vs facing TV.
- Export your favorite design and share with a friend or furniture store.
- Use that design to pick actual pieces from a Canadian retailer and import into your visualization tool.
This process avoids guesswork and ensures what you buy fits and looks the way you imagined.
How DecoraSync Enhances the Virtual Room Design Experience
DecoraSync can elevate the process by:
- Real-time link to product inventory — items used in your design can be instantly purchased or checked for availability.
- Cross-store checkout — combine furniture from multiple vendors into a single cart.
- Personalization engine — the system learns your preferences (style, budget) and suggests mood-appropriate décor.
- Seamless transitions between 2D, 3D, and AR previews — making it easier for users to test different perspectives.
Thus, DecoraSync bridges visualization with commerce, making the design-to-purchase journey smooth.
Start Designing with Confidence
Using a virtual room design tool doesn’t require mastery — with the right approach, any beginner can create compelling room layouts. This step-by-step guide walks you from measuring your space to refining layouts in 3D and selecting furniture.
Next time you redecorate or move, bring your imagination into a virtual planner first. And if you want a platform that ties your vision to real products — try DecoraSync’s design-to-shopping workflow.
Try one of the recommended planners (Planner 5D, Floorplanner, or HomeByMe), build your first room layout, then feed that into DecoraSync to test, buy, and build — all in one flow.